Hi everyone. So much has happened in the last couple of years. I have so much to share with you all. Over the next few weeks I will bring you to speed with
Facelift
Changing of front seats
More soundproofing - its an obsession!
Fitting of coilovers
Fitting of rear spoiler
removal of camper interior
Fitting of Kombi seats
Speak Soon!
Wednesday, 1 April 2015


Tuesday, 7 May 2013
Lovely clean oil

Since the installation was completed I have completed nearly 2000 miles and I must say it has thus far been a pleasant experience. Its a fantastic feeling to be driving for free!
I have also now had the van remapped by Pendle Agent Alex at Central of Coalville. Thoroughly nice chap, who in combination with some input from Martin at Pendle HQ unleaded 30-40% more horses from my 1.9 engine. Its a far more enjoyable place to be now that it is free to drive and you have a bit more oomph under your right foot.
Next installs on the van will a Appradio, Wi-Fi OBDII dongle and extra fuel gauge for the auxillary veggie oil tank.
Bye!
Sunday, 14 April 2013
The conversion is now complete
12th April 2013. I spent the day at dieselveg in Wolverhampton while Bertha was converted by the guys at DieselVeg.com. It is widely believed around the Internet that its not possible to run the PD engine in the 2004 vw t5 1.9 on vegetable oil. I suspect that this is because there are a few areas to watch out for when performing the conversion
1. You have to use a large extra tank for the vegetable oil rather than a small extra tank for the diesel and the main tank for the vegetable oil. The reason for this is that there is an in-tank high pressure pump which will quickly fail if run on vegetable oil.
2. You have to fit an auxiliary fuel pump to pump the veg oil from the auxiliary tank, you cannot rely on the mechanical pump driven the cam on its own to pull the oil through.
3. You have to fit two heat exchangers, one to warm the oil up to temperature and one to cool the return flow from the PD injector spill off. The hot oil from the injector spill off will trigger a de-rate if it s not brought back to normal temp.
4. You have too filter your oil down to 1 micron prior to putting into your tank, to be honest, this goes for any engine running on veggie oil.
1. You have to use a large extra tank for the vegetable oil rather than a small extra tank for the diesel and the main tank for the vegetable oil. The reason for this is that there is an in-tank high pressure pump which will quickly fail if run on vegetable oil.
2. You have to fit an auxiliary fuel pump to pump the veg oil from the auxiliary tank, you cannot rely on the mechanical pump driven the cam on its own to pull the oil through.
3. You have to fit two heat exchangers, one to warm the oil up to temperature and one to cool the return flow from the PD injector spill off. The hot oil from the injector spill off will trigger a de-rate if it s not brought back to normal temp.
4. You have too filter your oil down to 1 micron prior to putting into your tank, to be honest, this goes for any engine running on veggie oil.
 |
| View showing the solenoid valve, pump cooler module |

 |
| 62l fuel tank bing installed |

Friday, 15 February 2013
My WVO (Waste Vegetable Oil Filtration) System
Heres some photos of system in development


Frame built around some lightweight building blocks. I took the liberty of building in our unfurnished dining room as it was cold outside. Work progressed quickly!


The system is based around a 9 stage filtration taking it down to 1 micron! The stages are as follows
1. Course Sieve
2. Medium Sieve
3. Fine Sieve
4. Course Filter Sock
5. Medium Filter Sock
6. Fine Filter Sock
7. 50 micron 10" filter
8. 10 micron 10" filter
9. 1 micron 10" filter
The system uses a single pump that can be configured using valves to allow pumping between barrels and into the container for filling the vehicle.

My plumbing skills are fairly rudimentary and it was quite enjoyable putting it all together as it took shape quite quickly.


Heres the system more or less finished. Just need to move it to its permanent site outdoors and test!

220l Barrels sourced from Gumtree. I gave them a good wash as they were clearly home to some cleaning agent/solvent previously.

Frame built around some lightweight building blocks. I took the liberty of building in our unfurnished dining room as it was cold outside. Work progressed quickly!

I wanted to have a design that was easy to disassemble to allow cleaning of the barrels and also to get the thing out of the door!


1. Course Sieve
2. Medium Sieve
3. Fine Sieve
4. Course Filter Sock
5. Medium Filter Sock
6. Fine Filter Sock
7. 50 micron 10" filter
8. 10 micron 10" filter
9. 1 micron 10" filter

My plumbing skills are fairly rudimentary and it was quite enjoyable putting it all together as it took shape quite quickly.


Heres the system more or less finished. Just need to move it to its permanent site outdoors and test!
Vegetable oil Dreams
Hi all. Its been a while since I have updated the blog. A lot has happened, Im now a proud father!
My next project on the T5 is to convert to a twin tank vegetable oil system. A lot of people have doubted whether it is possible on the PD fuel system but recently I found increasing evidence that it is possible and has been successfully done on a number of VW PD engines.
Heres a few links
Dieselveg conversion of T5 bus
www.dieselveg.com
I decided to use WVO (Waste Vegetable Oil) and following the securing of a source of 40-60 litres per week I embarked on designing and building my own filtration system.
This website was a great inspiration
http://www.vegoilcar.co.uk/
These places were a great resource too
http://biopowered.co.uk/wiki/
http://vegetableoildiesel.co.uk/forum/
My next project on the T5 is to convert to a twin tank vegetable oil system. A lot of people have doubted whether it is possible on the PD fuel system but recently I found increasing evidence that it is possible and has been successfully done on a number of VW PD engines.
Heres a few links
Dieselveg conversion of T5 bus
www.dieselveg.com
I decided to use WVO (Waste Vegetable Oil) and following the securing of a source of 40-60 litres per week I embarked on designing and building my own filtration system.
This website was a great inspiration
http://www.vegoilcar.co.uk/
These places were a great resource too
http://biopowered.co.uk/wiki/
http://vegetableoildiesel.co.uk/forum/
Wednesday, 30 November 2011
More Sound Proofing
Sorry for the delays in updating the blog. I have been beavering away on more modifications to the van and only now am I finding the time to put some words and pictures online.
Regular readers will know that I am keen on making the van as sound proof as possible so that the driving experience is more luxury car than panel van. My latest focus has been to add insulation to the kitchen units, the engine bay and some other areas of the cabin.
 |
| Adding backs to the cupboards |
 |
| preparing the panels for the foam insulation |
This was a fairly straight forward exercise using some open cell foam I bought in a job lot from ebay. I simply cut the panels to size and then used some spray adhesive to secure the foam to the rear of the panels
 |
| foam attached |
Another area of focus was the engine bay. I decided to use some closed cell foam here to ensure that it didn't absorb moisture or oil. The material was purchased from ebay and came with a sticky back, so it was a simple job of cutting, peeling and sticking.
 |
| attaching to the underneath of the bonnet |
 |
| Foam as delivered |
 |
| under tray before cleaning |
 |
| under tray after cleaning |
 |
| under tray with soundproofing |
The last area of focus was the cab floor. This is a slightly longer task as you have to remove the seats. WARNING: please remember do this exercise on flat ground with the wheels chocked as when you remove the driver seat you have to remove the hand brake.
Once the seats were removed the flooring was also pulled up and flash band was applied to the entire floor area. Refitting the rubber carpet was a nightmare job, most probably because I didn't remove the lower plastic panel from underneath the gear stick..... (learn from my mistakes!)
 |
| Passenger seat removed |
Thursday, 18 August 2011
Sound proofing - an obsession illustrated with pictures!
Having spent a lot of time sound proofing the back of the van earlier on in the project my attention turned to the cab area. I used by iphone to identify areas of high noise (db meter app) and decided that a good start would be the dashboard.
The general guidance with any sound insulation is that the first step is to block sound and the second step is to absorb the sound. With this in mind I diassembled the dashboard as much as I could by taking off all of the access panels and by removing the glove box. Having done this I then added flash band tape to the plat surfaces to reduce resonance and provide some absorption for the high frequency noise.
While the panels were removed I used some synthetic fibre wool to fill the voids behind the dashboard to provide some sound absorption.


After replacing the glovebox I lined the inside of it with flashband tape.

This item is the tray from the top of the dash, as you can see I added flashband tape to lower its resonant frequency and to provide some damping.

I stuffed this cavity full of wool, taking care not to interfere with the electrical harnesses and steering system.
Sound system
Its been a while since I have updated what I have been doing. I have been doing quite a lot... so here goes.




Heres a view of the interior withe seat fitted. Its amazing when I look back at the humble plumbers van I first purchased in August 2009 and see what can be achieved with a bit of elbow grease!

I decided that the sound system fitted in the van was no where near good enought so I went to Loughborough and purchased a new Alpine CD single DIN and a set of 4 'fly' speakers to replace the standard door speakers and also to install into the rear of the van.

Fitting the fly speakers in the doors was pretty straight forward. I purchased the appropriate adaptors and they simply dropped in. I connected them up via the supplier crossover system and hey presto all was done.


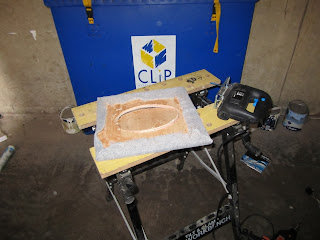
I decided that the 6*9s would work best mounted in the rear seat/bed base and so set about cutting the apertures to fit them. This was a really straightforward job as the speakers came with the appropriate templates.


Heres a finished speaker. I was quite pleased with the result.

I will add a better picture of the interior in due course.
Sunday, 22 May 2011
Interior moves on
I have been very busy beavering away on the van over the last month ticking off small jobs here and there and getting the cushions sorted. I finished off the bed box at the front and carpeted it to make it look neater and fit in with the rest of the van.
 |
| fitting the seat kick board |
This area would also serve as useful storage and a place to fit some extra speakers.
 |
| seat kick board fitted |
There it is finished and ready to be carpeted. I used 6mm ply for this, its likely that I will go around all of the 6mm ply areas and sound deaden with flash band or maybe some proprietary material. The thinner play does lend itself to booming which I do not want!
|
| interior looking nearly finished |
Here's a few of the interior on our 'shakedown' camping trip to the peak district. The van is by no means finished yet so we were able to create a snag list of things to tackle next.
Tuesday, 26 April 2011
Interior Build Part 3 - fitting the sink into the worktop

A campervan is not really a campervan unless it has a sink. I decided upon a SMEV unit which I sourced via ebay. It has two gas burners and a sink and came with a tap that actuates the pump electrically upon operation. The quality of the item is good, the only issue is that no template is supplied to allow you to work out what size/shape of a hole to cut out for it ! I got around this by tracing the outline of the whole thing and then measuring in from the line appropriately and then using those points to describe the appropriate profile.

A bit of jigsawing later and the hole was cut. The next step was to cut down into the wall between the cupboards to allow for the depth of the sink and gas fittings.

Tadah! the unit fitted perfectly. I decided not to use the SMEV fixing method which involved a completely inpractical arrangement of oddly shaped fixing points, instead I opted for silicone... I may live to regret it but several hundred miles later and its absolutely fine.
Tuesday, 19 April 2011
Mobile Blogging test.
Journey to work. Not in Bertha this morning.

- Posted using BlogPress from my iPhone
- Posted using BlogPress from my iPhone
The interior build part 3
With the units installed and fixed the next step was to finish off the bed platform and to begin fitting the doors to the cabinets. I decided to get up early again and have good days worth of work progressing to my goal of using the van at the easter bank holiday.

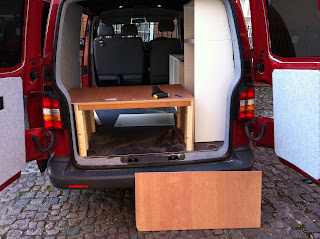


So heres where I left the the bed platform at. As mentioned previously the goal now was to make it stiffer laterally.

To achieve this a piece of 9mm ply was cut and the bottom left hand corner scribed and jigsawed to fit the contour of the van.

By now I had got quite adept at scribing and the piece fitted first time, perfectly!

I then set about marking out and then cutting the aperture to enable the area to be used for storage. The eagle eyed amongst you will have spotted that the other side of the bed platform had been finished also. the result of fitting the both of these panels was that the whole structure became incredibly stiff, a quick test with me trying to move it with my body weight proved this!
The interior build Part 2
With the bed platform given a jumpstart due to teamwork between myself, my Dad and my Mam the next weekend was set for further leaps forward. The weather was also getting much better and bank holidays approaching fast - I decided to up the ante. This particular weekend I decided to be up and working on the van by 8am...

I was keen to get started on the other elements of the kitchen install and as mentioned previously this meant a trip to Ikea to get the units and doors. I decided that this weekend that I would work in the courtyard of my apartment building (it was a lovely day).


The first job was to build all the units. Ikea units are pretty straightforward to put together, if a little boring! Its quickly done and then I started the job of adapting the units to fit the contours of the vehicle.


It is important to treat the collection of units as one unit during this fitting process. What you will find if you decide to follow a similar path is that you have to space the units a little bit out from the wall to ensure you compensate for the curve in towards the roof of the vehicle. I suggest that you build all the units up, fix the position along the length of the vehicle before starting your scribing exercise.


Next was to tackle the top unit at the rear. This was a little more tricky to get right as there are two dimensions that you need to scribe in.
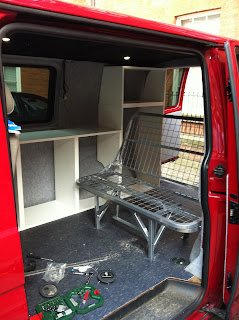

I was keen to get started on the other elements of the kitchen install and as mentioned previously this meant a trip to Ikea to get the units and doors. I decided that this weekend that I would work in the courtyard of my apartment building (it was a lovely day).


In order to get the contours correct I used the 'scribing' technique which was passed from Father to Son in the recent bed platform build. This enabled me to , relatively quickly, get the cabinets cut to fit over the wheel arch and to fit into the rear portion, near the doors.


It is important to treat the collection of units as one unit during this fitting process. What you will find if you decide to follow a similar path is that you have to space the units a little bit out from the wall to ensure you compensate for the curve in towards the roof of the vehicle. I suggest that you build all the units up, fix the position along the length of the vehicle before starting your scribing exercise.

After not too long an the use of a jigsaw I got the units to fit very nicely. I was very pleased with myself at this stage!


Heres where I got to by the end of the day. Units were all in and I fixed them to the floor using screws into the ply and used a collection of brackets to fix to the walls. A good days work.
Subscribe to:
Posts (Atom)